Cozy Starbucks Cake Pops Recipe
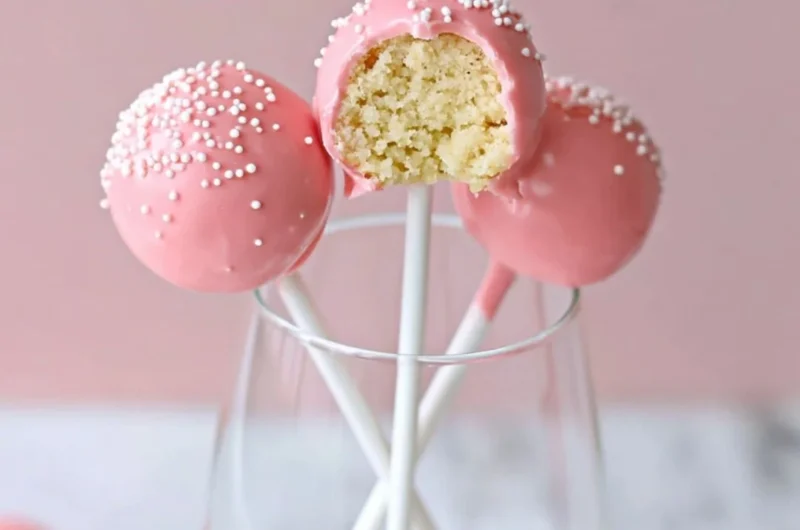
There’s something undeniably magical about a sweet treat that evokes warm memories and delightful moments, don’t you think? Picture this: the delightful aroma of vanilla cake baking in your kitchen, wafting through the house and creating an ambiance that feels like a warm hug on a chilly day. It’s the perfect comfort of creamy sweetness just waiting to be enjoyed. That’s exactly what you’ll find with these delectable Starbucks Cake Pops! Whether you’re sharing them with friends or indulging in a well-deserved solo moment, these little bites of joy are sure to become a beloved staple.
This easy weeknight dessert is not just for the cupcake lovers among us; it’s for anyone who craves a little sweetness in their life. So grab your ingredients, and let’s whip up these delightful cake pops together! This is one you’ll definitely want to pin for later!
Why You’ll Love This Recipe
- Quick and Convenient: Using a box vanilla cake mix makes this recipe incredibly easy for busy days or spontaneous cravings.
- No-Bake Fun: The chilling time is minimal, so you can indulge in your sweet treat without waiting all day.
- Customizable: You can dress up the cake pops with festive sprinkles, toppings, or even switch out flavors to suit every occasion!
- Family-Friendly Activity: This is a fun recipe to make with kids or friends, so gather everyone and get hands-on in the kitchen.
- Crowd-Pleasing Treat: Perfect for birthdays, parties, or cozy family gatherings—everyone loves a good cake pop!
What You’ll Need
- 1 box vanilla cake mix
- 1 cup frosting (vanilla or your choice)
- 1 bag of melted candy (candy melts or chocolate)
- Lollipop sticks
- Sprinkles (optional)
How to Make Starbucks Cake Pops
- Start by baking the vanilla cake according to the package instructions. Let it cool completely, allowing all that fluffy goodness to settle.
- Once cooled, crumble the cake into a large bowl, breaking it apart until it resembles fine crumbs.
- Add the frosting to the crumbled cake and mix until fully combined. You want it to be cohesive and moldable—like a sweet, tender dough.
- Roll the mixture into small balls, about the size of a golf ball, then place them neatly on a baking sheet.
- Chill the cake balls in the refrigerator for at least 30 minutes to ensure they hold their shape beautifully.
- While the cake balls are chilling, melt the candy according to the package instructions, creating a luscious coating.
- Once the candy is melted, dip the end of a lollipop stick into the melted candy, then insert it into each cake ball.
- Fully dip each cake pop into the melted candy, ensuring it’s coated evenly; let the excess drip off.
- If you’re feeling festive, sprinkle them with toppings or sprinkles of your choice before the candy sets.
- Let the cake pops cool and set on a stand or styrofoam block until they’re firm to the touch.
Variations & Creative Twists
- Flavor Explosion: Swap out the vanilla cake mix for chocolate or red velvet to add a rich twist to your cake pops.
- Fruity & Fun: Add in some finely chopped fruits, like strawberries or crushed pineapple, to the cake mix for a refreshing flavor.
- Indulgent Drizzle: Once they’ve set, drizzle with contrasting chocolate for a beautiful touch—think dark chocolate cascading over a vanilla pop!
- Zesty Lemon Cake Pops: Mix in some lemon zest and a lemon-flavored frosting for a bright, citrusy pop that’s refreshingly delicious.
Chef Emma’s Helpful Tips
- Make-Ahead Magic: Prepare the cake balls a day in advance — just keep them tightly wrapped in the fridge until you’re ready to dip them in candy.
- Ingredient Swaps: Feel free to use store-bought frosting or make a cream cheese frosting for a richer flavor that pairs perfectly with chocolate.
- Slicing Tricks: If you find your cake is too crumbly, mix in a bit more frosting; the consistency should be easily moldable.
- Storage Suggestions: Store your cake pops in an airtight container in the fridge for up to a week, but let them come to room temperature before serving for the best taste!
Nutrition Information per Serving
- Serving size: 1 cake pop
- Calories: 160
- Carbohydrates: 20g
- Sugar: 14g
- Fat: 7g
- Protein: 1g
- Sodium: 30mg
Frequently Asked Questions
- Can I make this ahead? Yes! You can prepare the cake balls a day in advance and store them in the fridge.
- Can I use different ingredients? Absolutely! Feel free to explore different cake flavors and frostings to suit your taste.
- How do I store leftovers? Store any uneaten cake pops in an airtight container in the refrigerator for up to a week.
- How long does it last? If stored properly, your delightful cake pops can be enjoyed for about 7 days!
A Cozy Closing Note
These Starbucks Cake Pops are not just a treat, but a warm slice of nostalgia and joy to be shared with loved ones. Whether you whip them up for a special occasion, a cozy night in, or as a charming surprise for a friend, they are bound to bring smiles all around. Save this Starbucks Cake Pops recipe to your dessert board so it’s ready when you need a cozy treat!

Cozy Starbucks Cake Pops
- Total Time: 45 minutes
- Yield: 12 servings 1x
- Diet: Vegetarian
Description
Delightful Starbucks Cake Pops made from vanilla cake mix, perfect for sharing or enjoying solo on a chilly day.
Ingredients
- 1 box vanilla cake mix
- 1 cup frosting (vanilla or your choice)
- 1 bag of melted candy (candy melts or chocolate)
- Lollipop sticks
- Sprinkles (optional)
Instructions
- Start by baking the vanilla cake according to the package instructions. Let it cool completely, allowing all that fluffy goodness to settle.
- Once cooled, crumble the cake into a large bowl, breaking it apart until it resembles fine crumbs.
- Add the frosting to the crumbled cake and mix until fully combined. You want it to be cohesive and moldable—like a sweet, tender dough.
- Roll the mixture into small balls, about the size of a golf ball, then place them neatly on a baking sheet.
- Chill the cake balls in the refrigerator for at least 30 minutes to ensure they hold their shape beautifully.
- While the cake balls are chilling, melt the candy according to the package instructions, creating a luscious coating.
- Once the candy is melted, dip the end of a lollipop stick into the melted candy, then insert it into each cake ball.
- Fully dip each cake pop into the melted candy, ensuring it’s coated evenly; let the excess drip off.
- If you’re feeling festive, sprinkle them with toppings or sprinkles of your choice before the candy sets.
- Let the cake pops cool and set on a stand or styrofoam block until they’re firm to the touch.
Notes
Make the cake balls a day in advance and store in the fridge. Use store-bought frosting or cream cheese frosting for a richer flavor.
- Prep Time: 15 minutes
- Cook Time: 30 minutes
- Category: Dessert
- Method: Chilling & Dipping
- Cuisine: American
Nutrition
- Serving Size: 1 cake pop
- Calories: 160
- Sugar: 14g
- Sodium: 30mg
- Fat: 7g
- Saturated Fat: 3g
- Unsaturated Fat: 4g
- Trans Fat: 0g
- Carbohydrates: 20g
- Fiber: 0g
- Protein: 1g
- Cholesterol: 0mg